The description of the VPS backup additional service
Backup represents the key pillar to ensuring secure operation of any infrastructure, therefore we extended the portfolio of our services by adding the option of ordering the additional service of backup to the VPS service. There are following options of virtual private server backup: automatic weekly backup, manual backup and automatic daily backup. The stated options can be combined with each other, which means that it is possible to order all the stated options for one machine.
The specifics of the particular VPS backup options
| VPS backup option | Backup frequency | Number of backups recorded |
|---|---|---|
| Automatic weekly backup | Weekly | Max. 4 last backups |
| Manual backup | As needed | Max. 5 backups |
| Automatic daily backup | Daily | Max. 7 last backups |
The weekly automatic backup allows to keep the backups from every week of the last month. The backups are carried out automatically once a week. The first backup is performed 7 days after the spawning of the VPS, each next backup is taken after next subsequent 7 days. The backups are carried out during the night, that is during the period with the presumed minimal load of the VPS. There is a maximum of four last backups which can be kept simultaneously. There is a maximum of four last backups which can be kept simultaneously. When this maximum of the backups kept simultaneously is reached, the oldest backup is overwritten every time the new backup is performed.
Unlike the automatic backup, the manual backup allows to keep the older backups for a longer period. While the automatic backup provides the backups of age max 1 month (weekly backup) or 1 week (daily backup), the manual backup is not limited given the age of the backups at all. The execution of the backup is initiated by the user himself. In this option, the maximum of 5 manual backups can be stored simultaneously. When this maximum of the backups kept simultaneously is reached, the user must initiate the removal of some of the stored manual backups in order to be able to perform another manual backup.
The automatic daily backup provides the possibility to keep the backups from every day of the last week. The backups are carried out automatically during the night of the given day. There is a maximum of seven last backups which can be kept simultaneously. When this maximum of the backups kept simultaneously is reached, the oldest backup is overwritten every time the new backup is performed.
The management of the backups within the customer portal
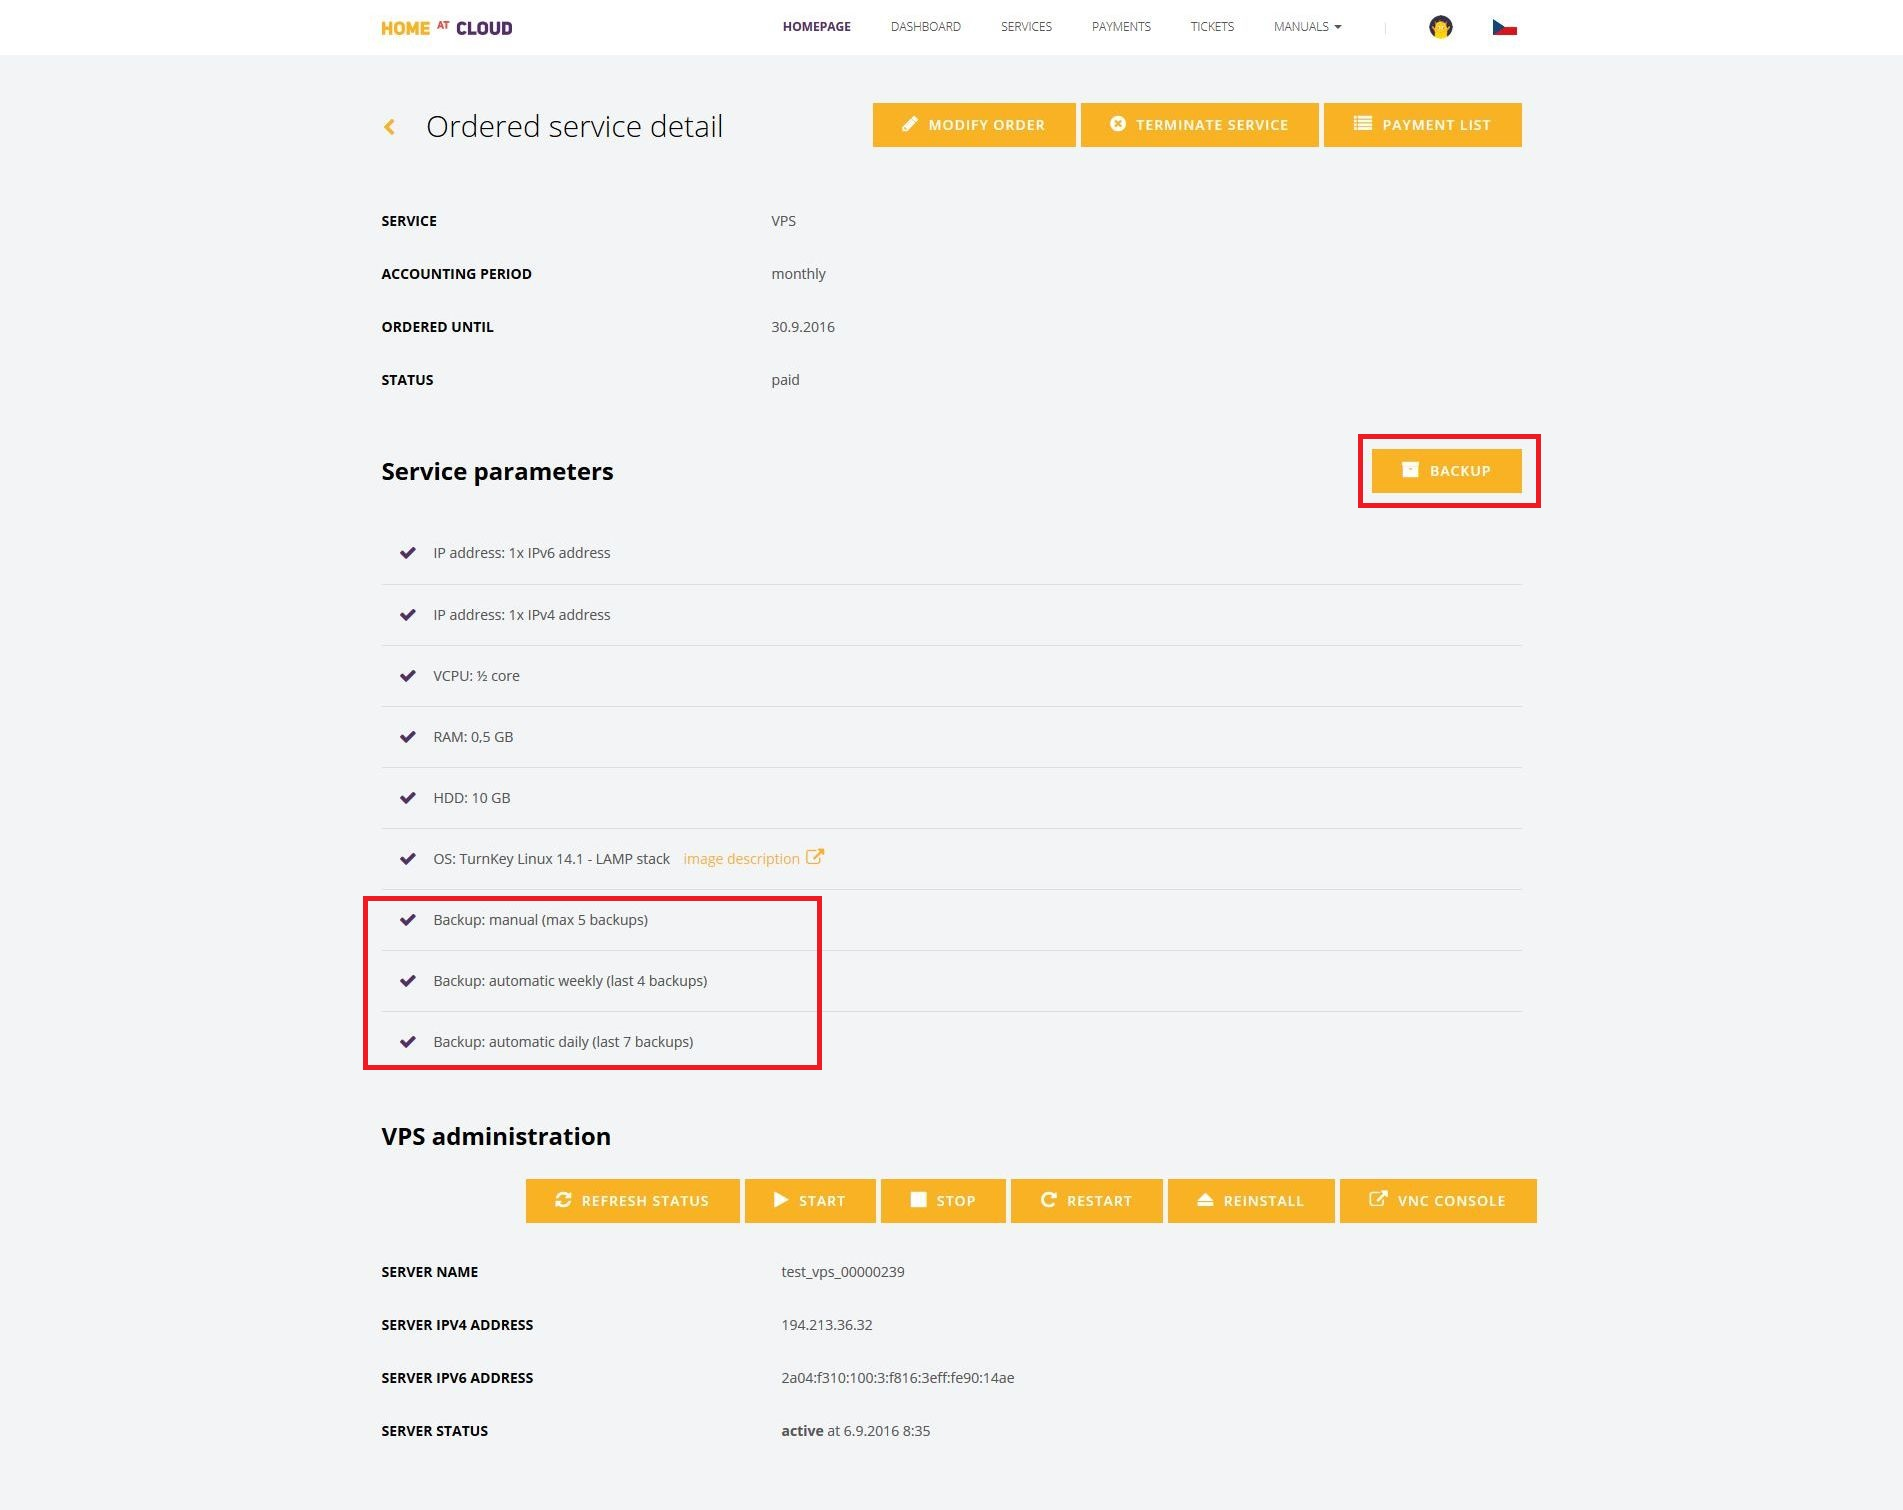
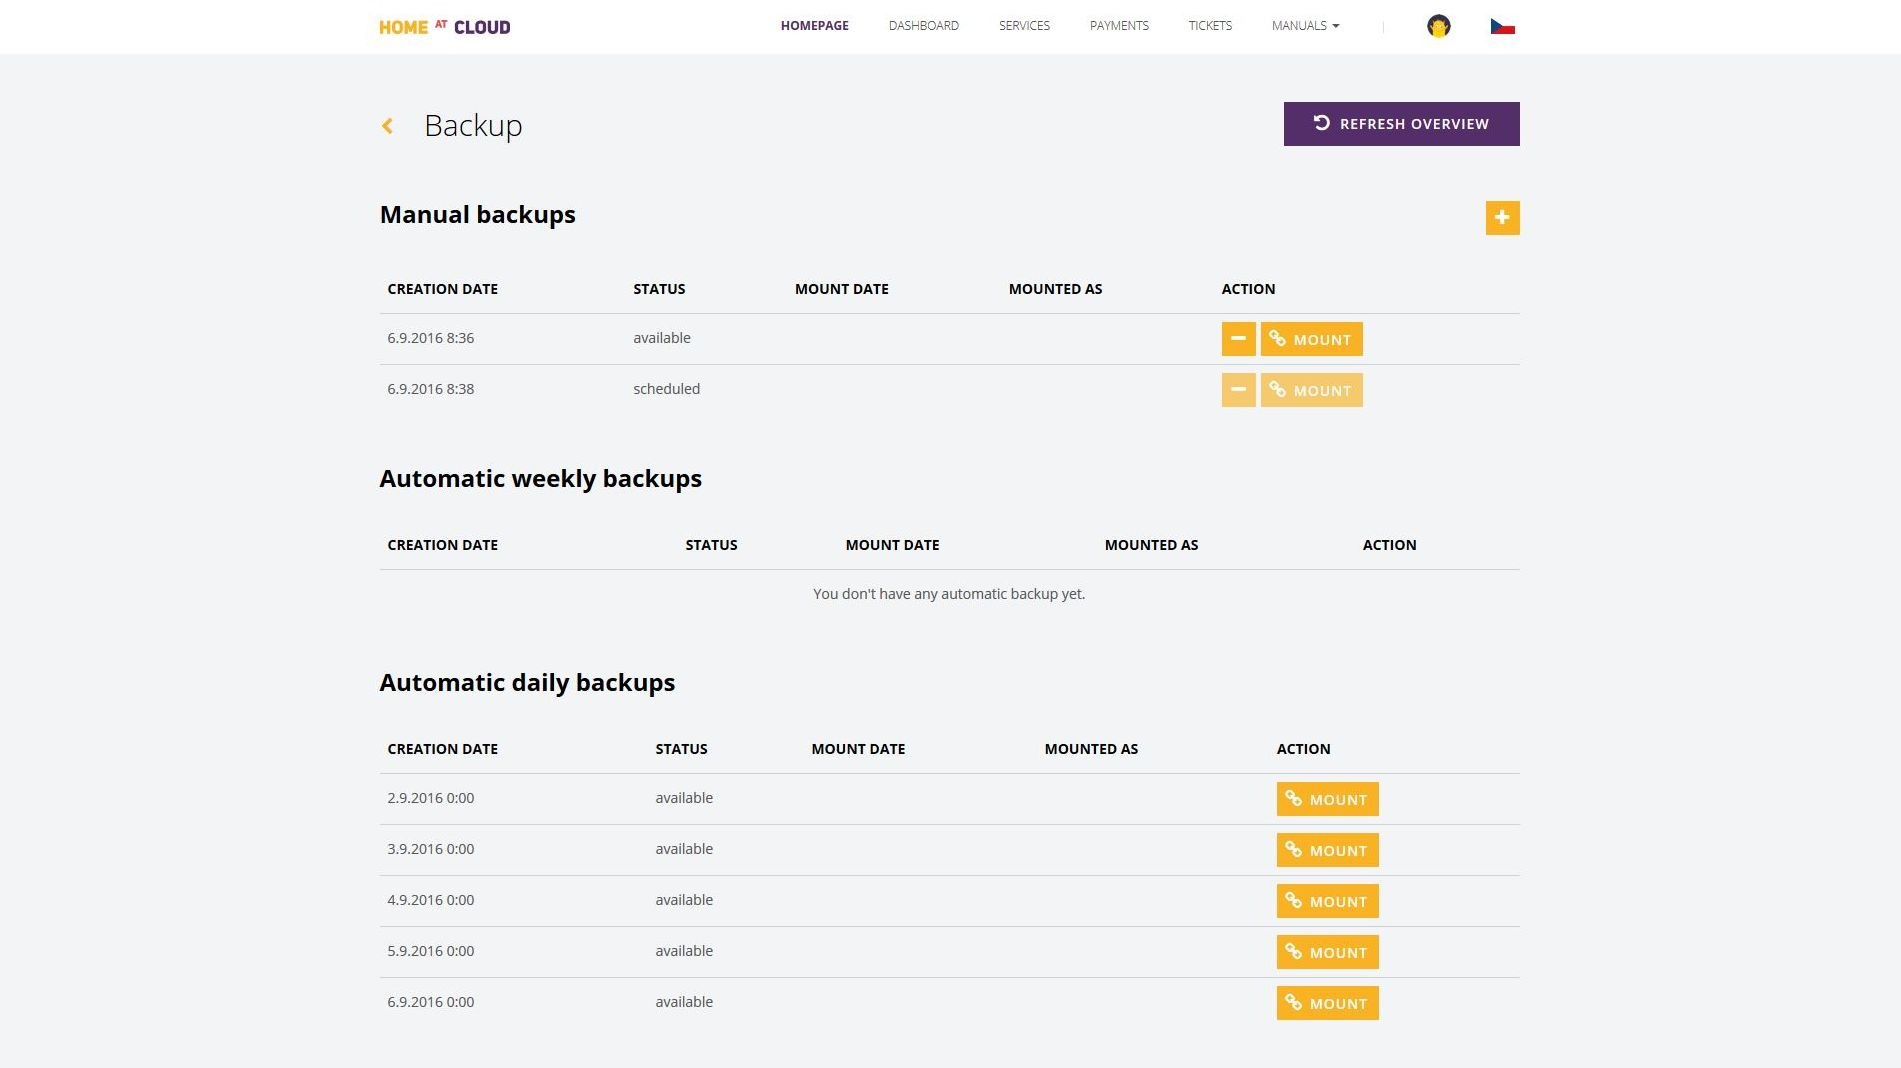
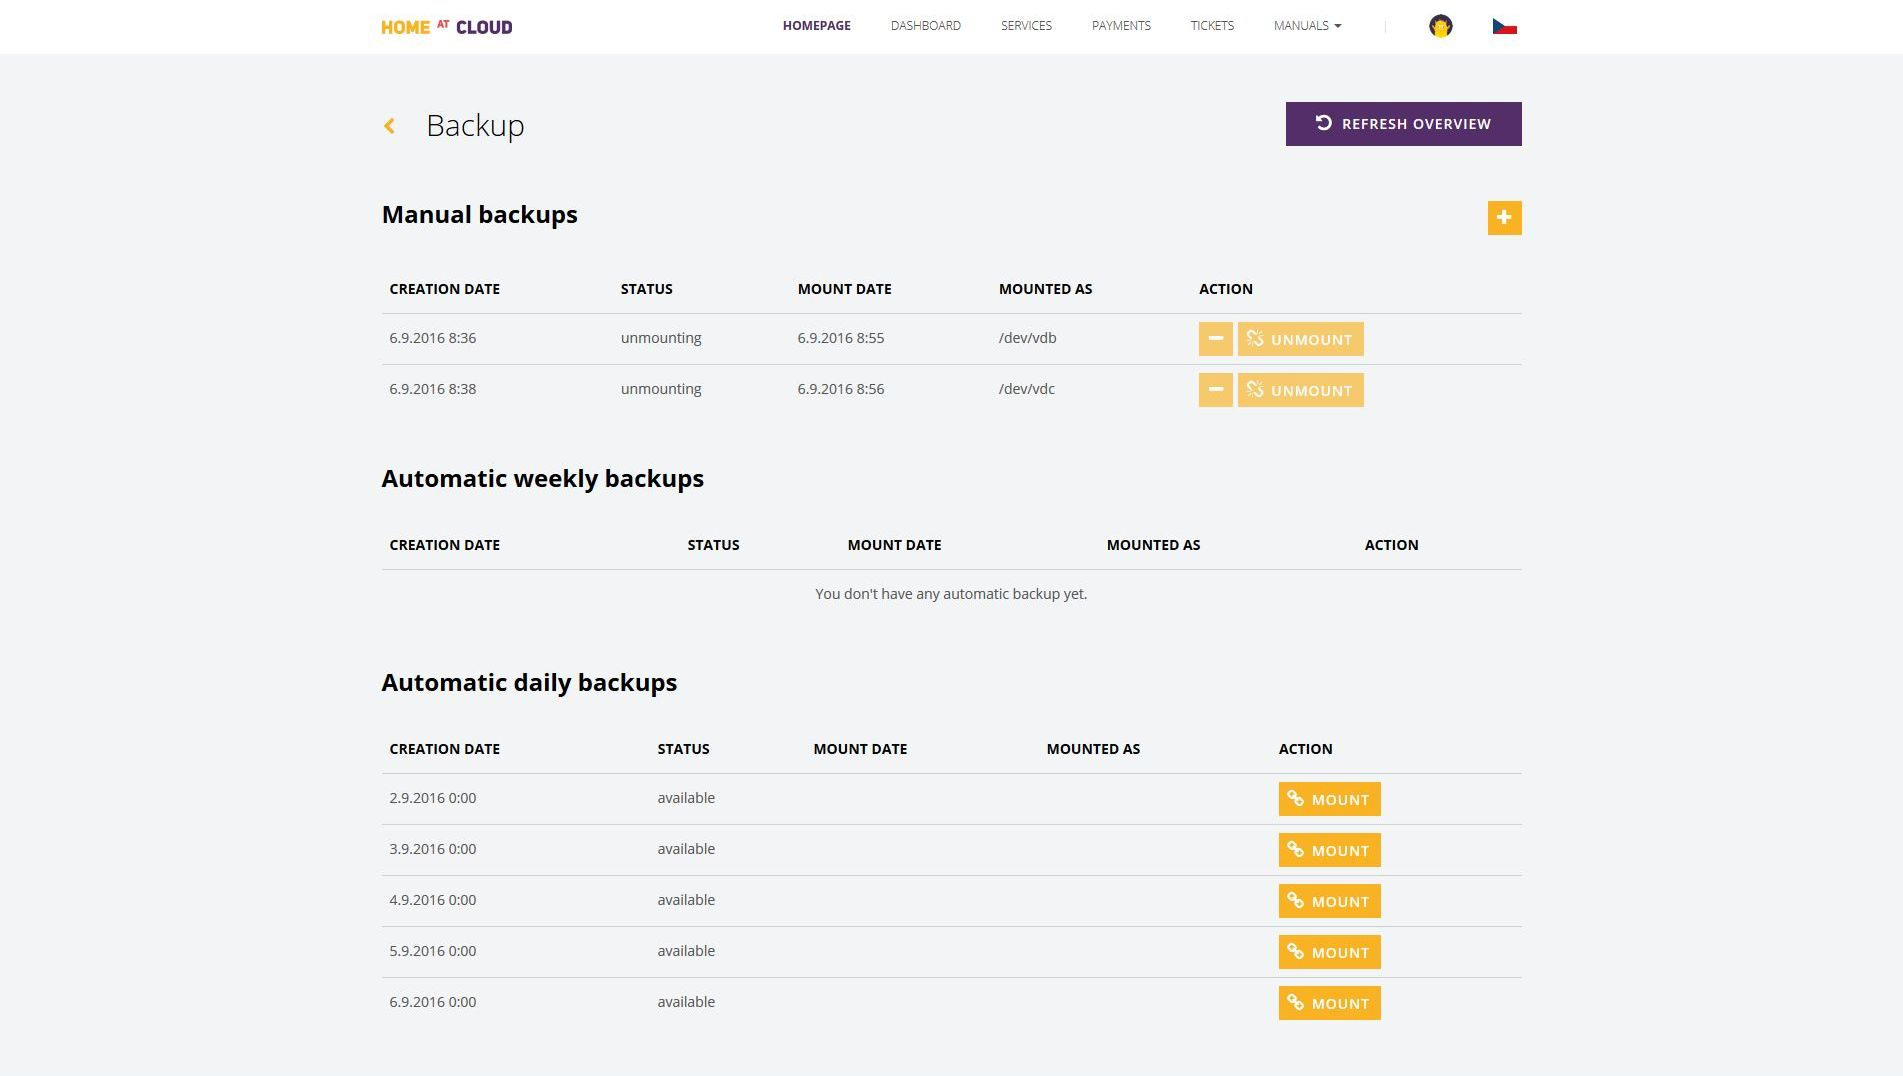
All the backups from all of the backup options are manageable via the customer portal. The tools for its management can be reached from the detail of the given service, where the section „Service parameters“ indicates the ordered additional backup services including its type. The „Backup“ button, which can be found here, directs us the „Backup“ screen of the given VPS service. On this screen, the backups are divided into particular sections based on its type (manual, daily, weekly).
Every automatically performed backup will automatically appear in the respective section and its state will be „available“. The manual backups will not appear until you create some. To do so, you can use the button „Add“ (the plus symbol) located in the right upper corner of the „Manual backups“ section. Hitting that button will result in the new record of the backup appearing in the given section, its state going from „scheduled“ to „uploading“ and finally to „available“. The manual backups can be deleted (this is not an option with the automatic backups) using the „Delete“ button (the minus symbol) located on the right side in the row of the given backup.
Every backup which is in the state „available“ can be mounted to the given VPS and after that can be used just as another disk volume of the virtual machine, which eases copying and recovery of the data and other relevant operations. It is possible to mount several backups to the VPS simultaneously, even all the stored backups. However, we recommend to mount only the required backups and at the same time we strongly recommend to do the unmounting as soon as the backup is not needed anymore, so that the mounted backups would not influence the performance of the machine. In case of the GNU/Linux OS, the mounted backup is read-only, that is, it allows for data recovery, not for the data record on such volumes. In case of the Windows OS, the mounted backup is automatically unmounted two hours after it was mounted, that is, any changes made to these backup volumes will be lost. The only purpose of all the backups is just for data recovery.
Mounting the backup to the VPS
The procedure of mounting the backup to the VPS includes two main steps:
- Firstly, it is necessary to mount the backup to the VPS from within the customer portal. It can bet he backup of any kind (daily, weekly, manual), but it must be in the state „available“ unconditionally. Otherwise it won’t be possible to mount the given backup. After mounting the backup successfully from within the customer portal (status=“mounted“), such backup becomes „visible“ from within the given VPS and it is possible to proceed to the following step.
- Secondly, the backup mounted successfully from within the customer portal, needs to be mounted from within the given VPS. Thereafter, it will be possible to use the given backup as another disk volume, which makes the data recovery much easier.
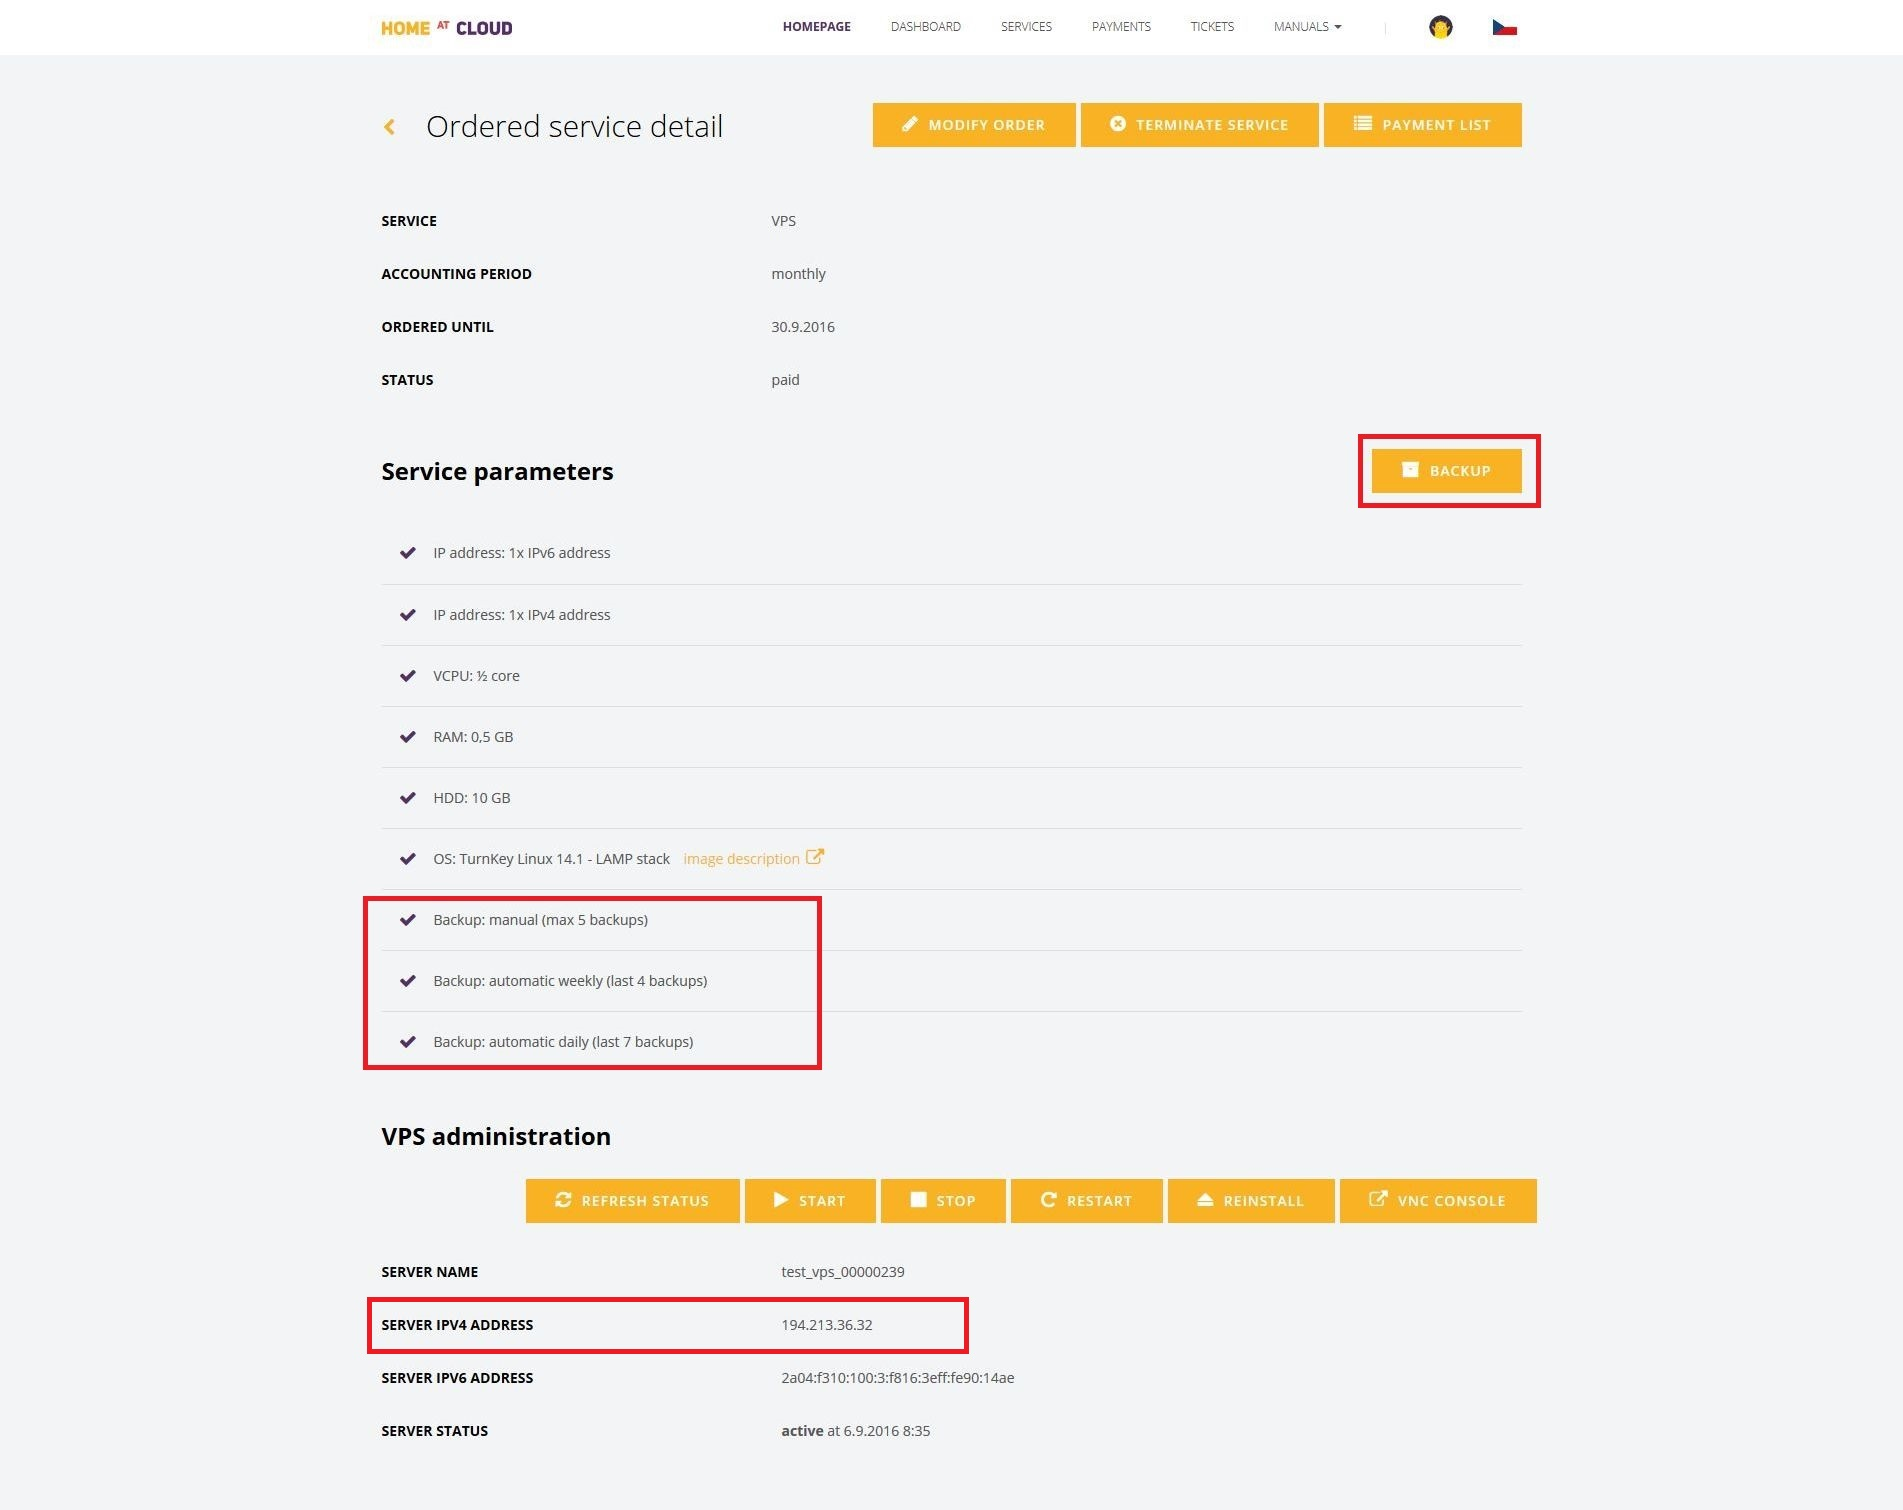
Let’s start with the first step. In the customer portal we view the detail of the given VPS service, for which we have the additional service of backup ordered. Here, we can copy the IPv4 address of the given machine, which we will need later for the verification of the changes made. Clicking on the „Backup“ button will brings us to the screen where we can administrate the available backups of the given VPS service.
Now, we connect remotely to the given VPS machine (we can use the console from within the customer portal, shellinabox if the OS of the machine is some of the TKL images or some client for remote connection, such as PuTTY), for what we use the stated IPv4 address and the credentials, which we have recieved upon the activation of the VPS service.
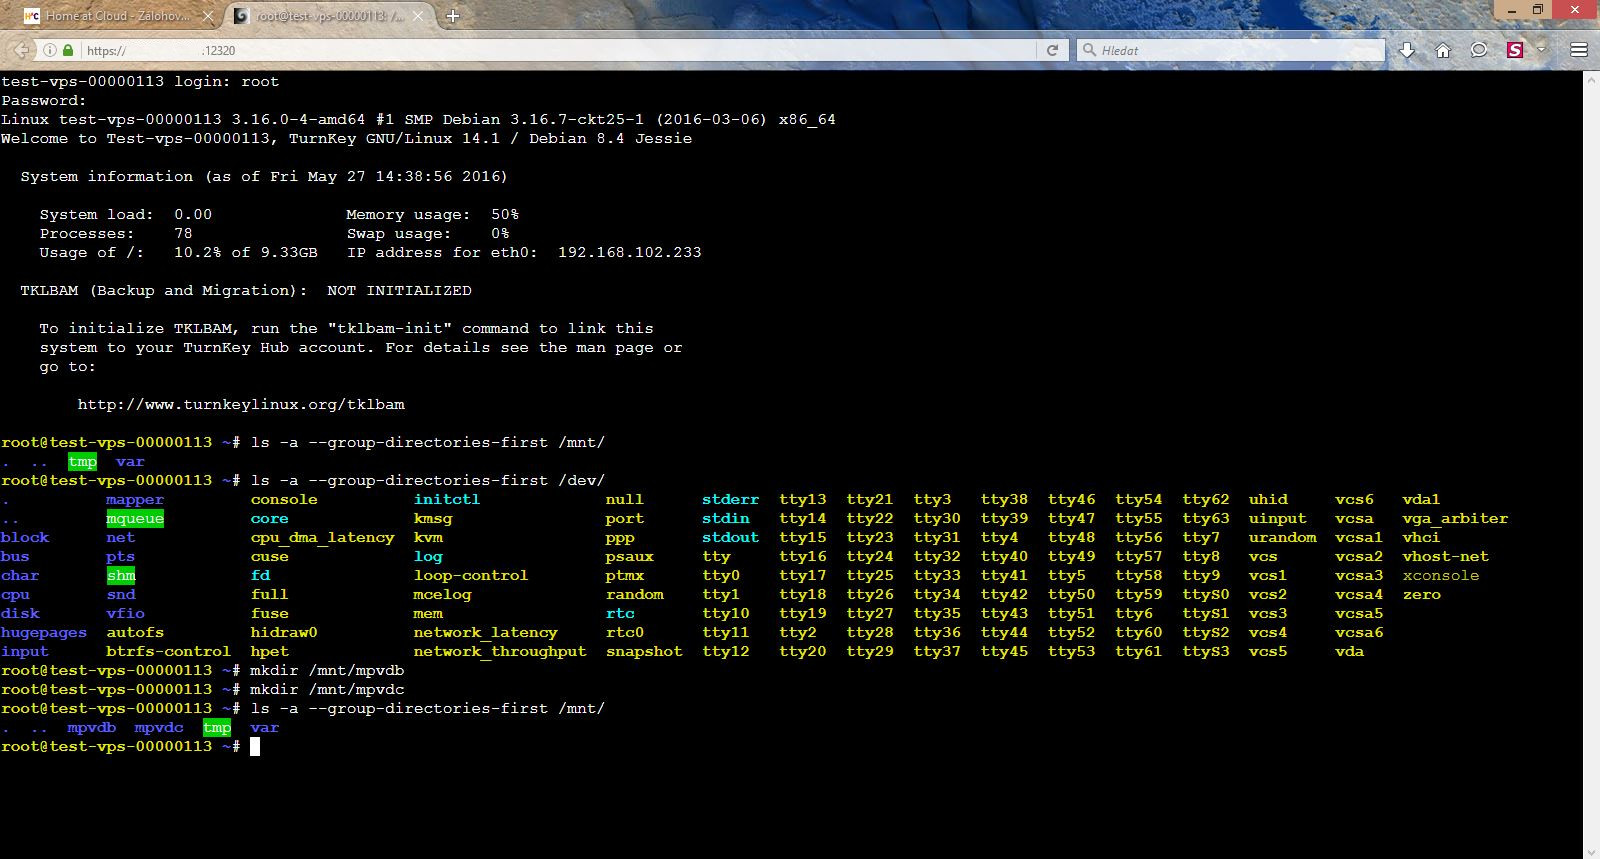
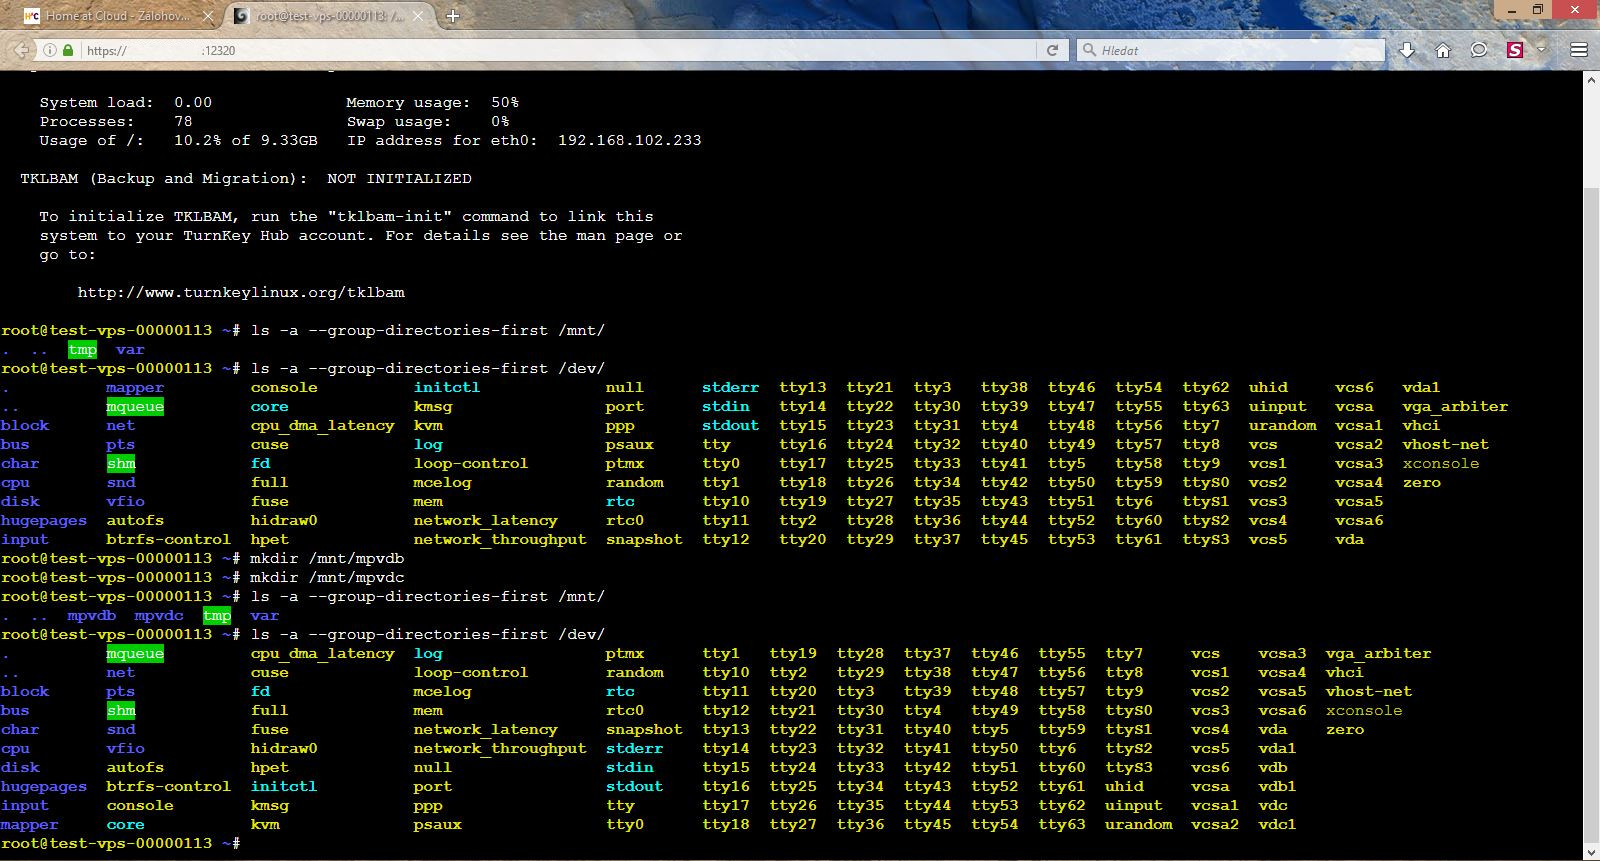
After the successful connection and login in to the VPS with the GNU/Linux OS, we use for example the ls -a /dev/ command, which tells us that the only disk available at the moment is the root disk of the VPS (vda1). If we want to mount more backups simultaneously, we prepare more mount points. Using for example the mkdir /mnt/mpvdb command, we create the /mnt/mpvdb directory, which will serve as a mount point for the first backup. Similarly, we can create the directories /mnt/mpvdc, etc. Using the ls -a /mnt/ we verify the success of the creation of the given directories (mount points). If we were to mount just one backup, we could skip that step. Now, we can return back to the customer portal in order to mount the desired backup.
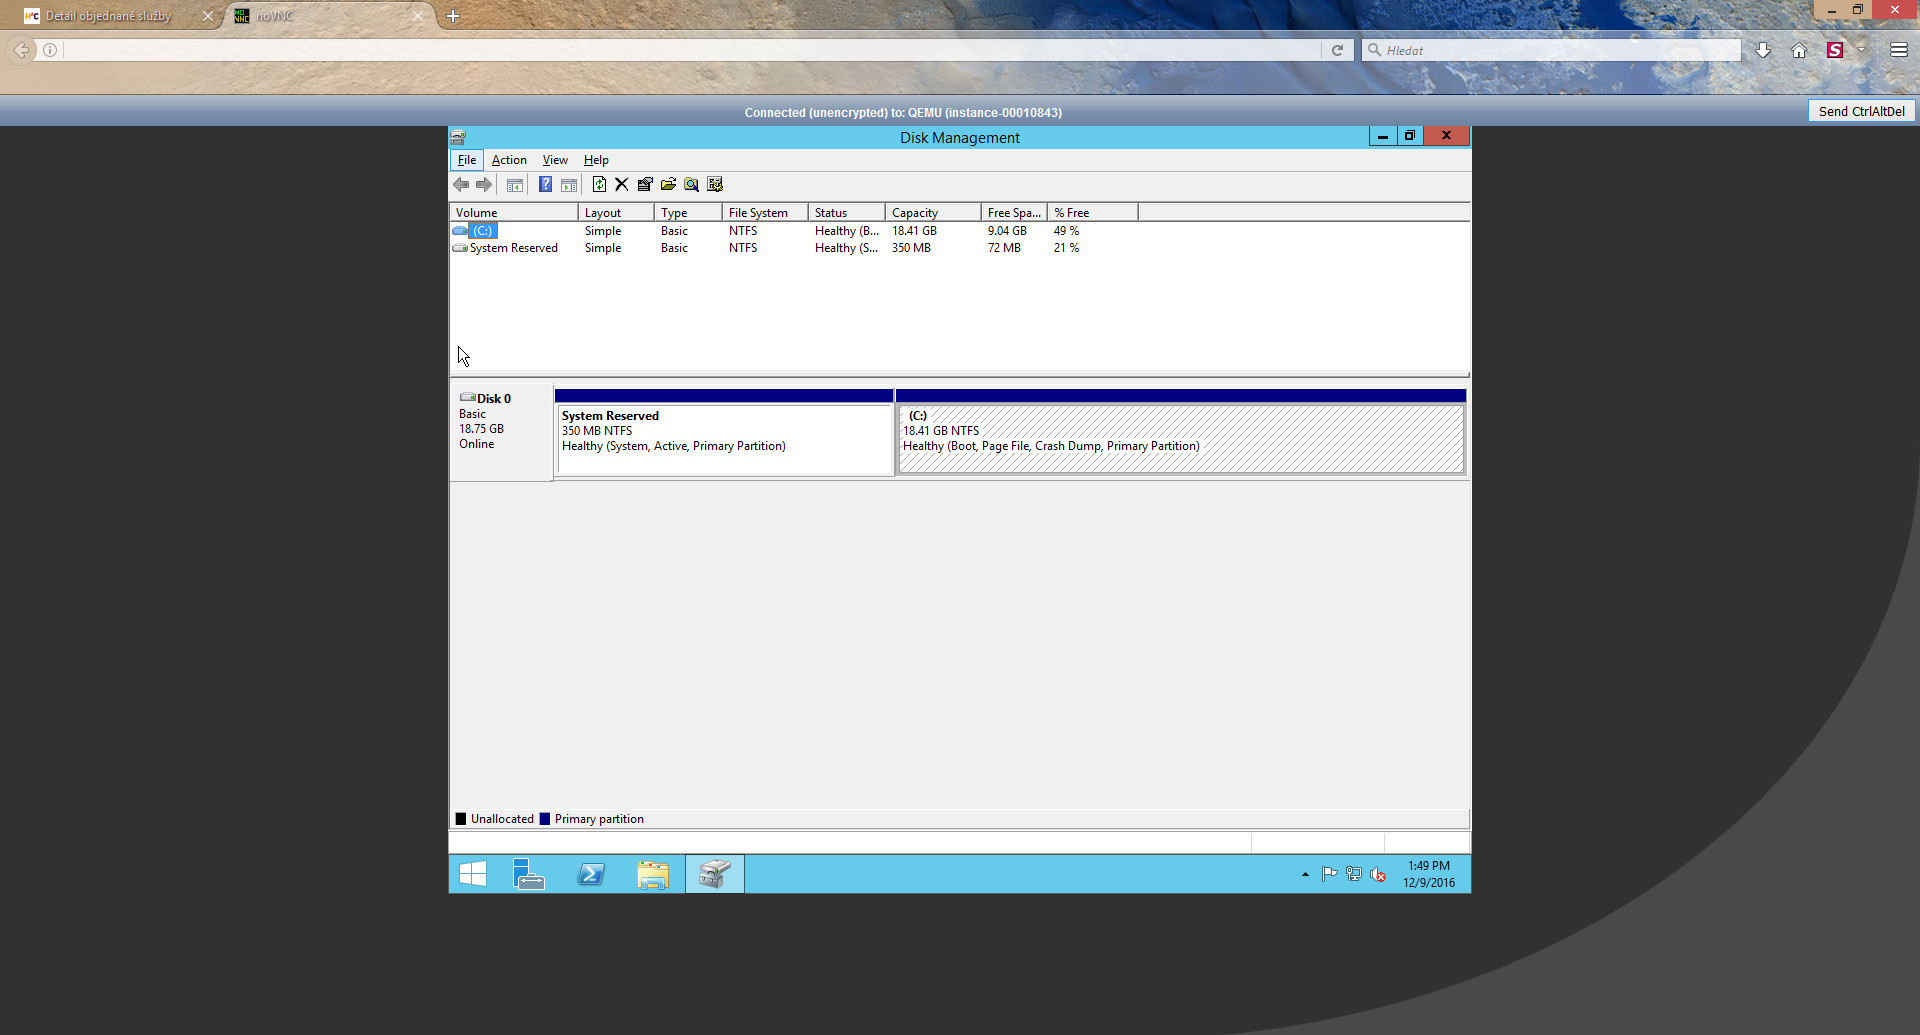
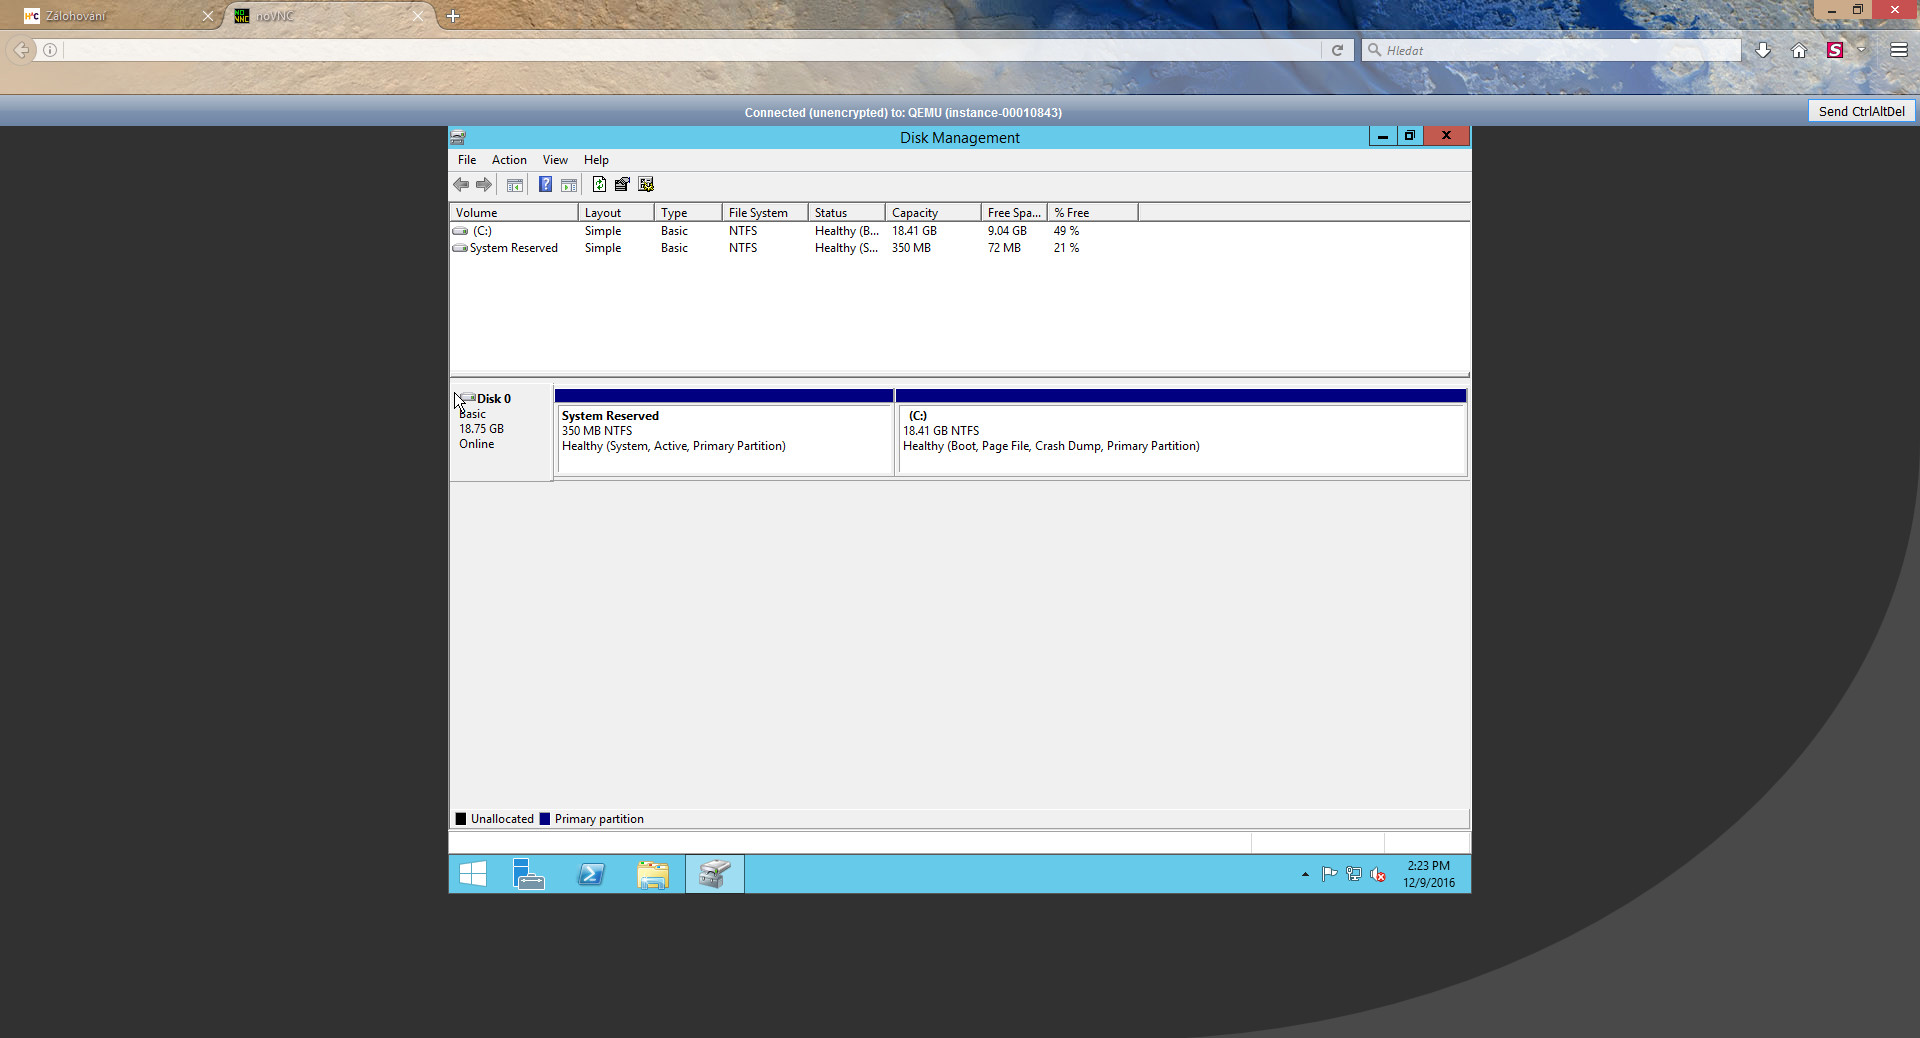
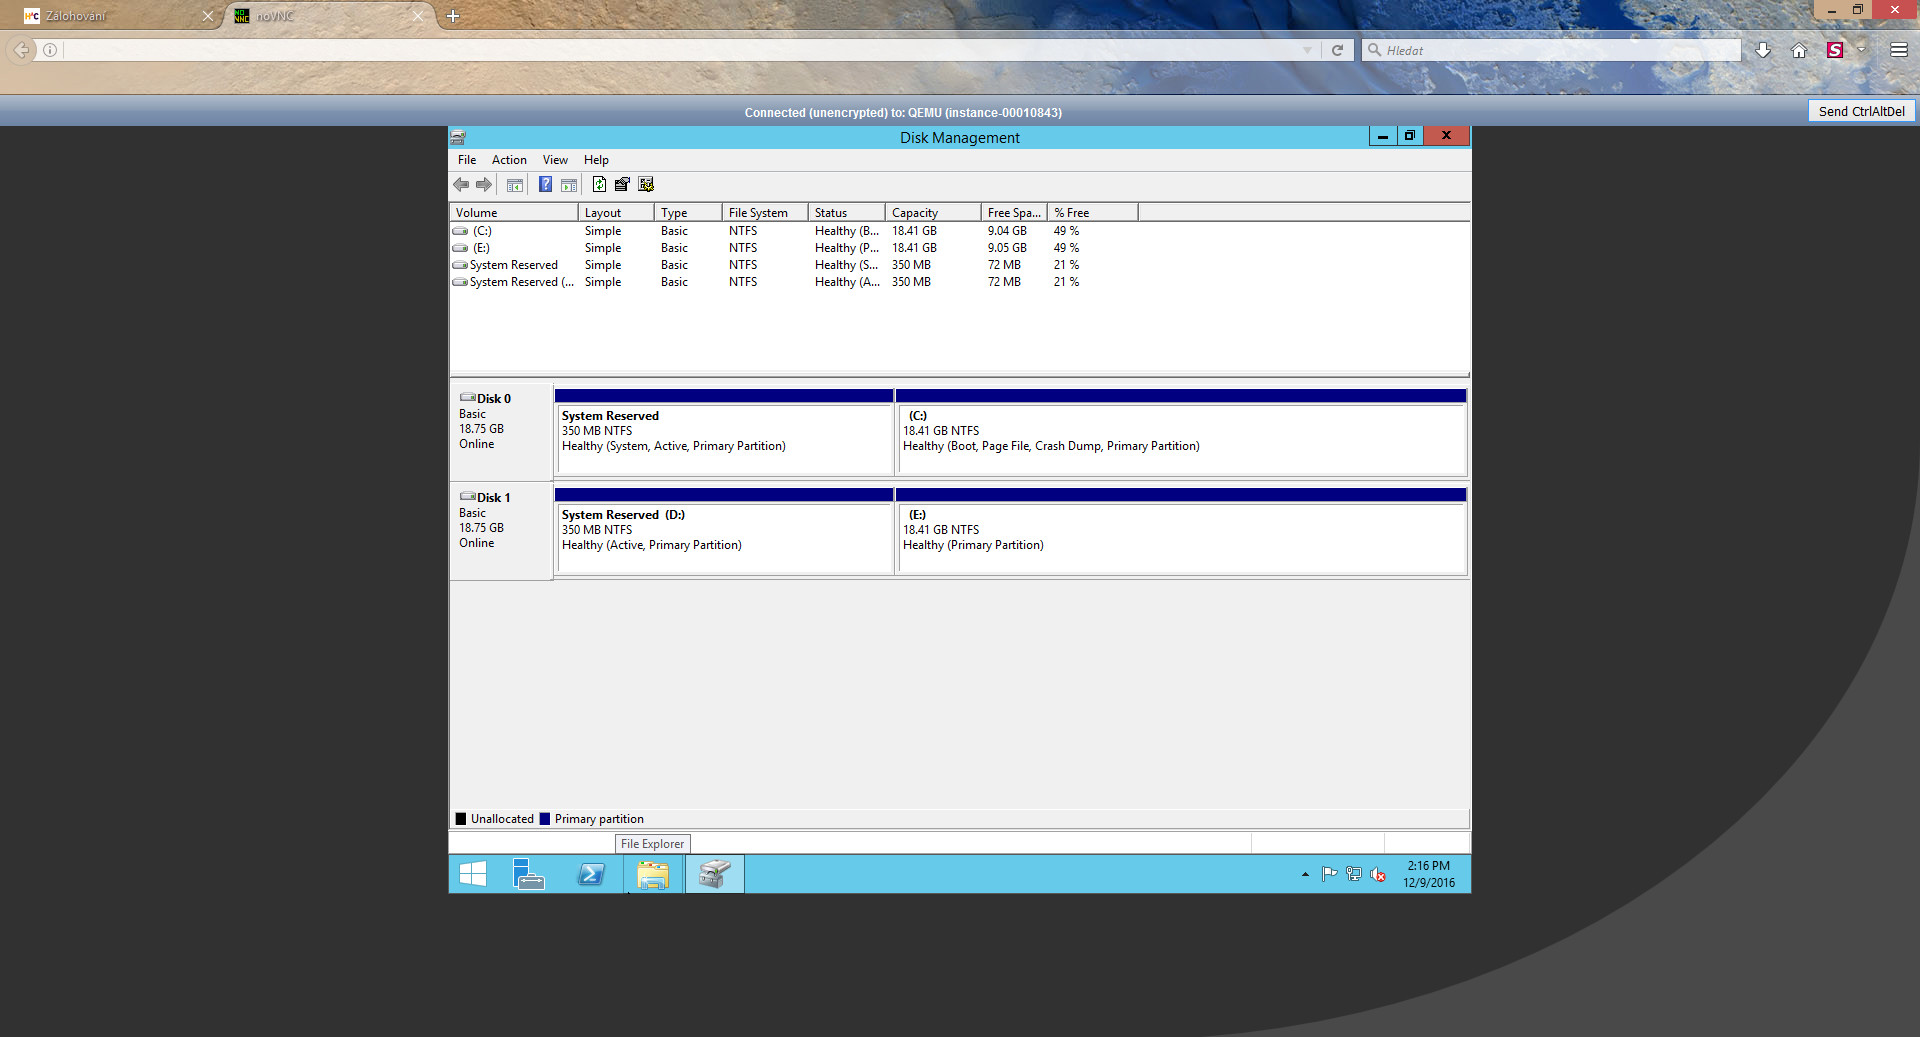
After the successful connection and login to the VPS with the Windows OS, we right-click the start button in the left bottom corner of the screen and select the Disk Management option from the context menu. The system will show the disk manager which tells us that the only disk available at the moment is the basic disk (Disk 0). In case of the Windows OS, there is no need to prepare any mount points, so we can return back to the customer portal in order to mount the desired backup.
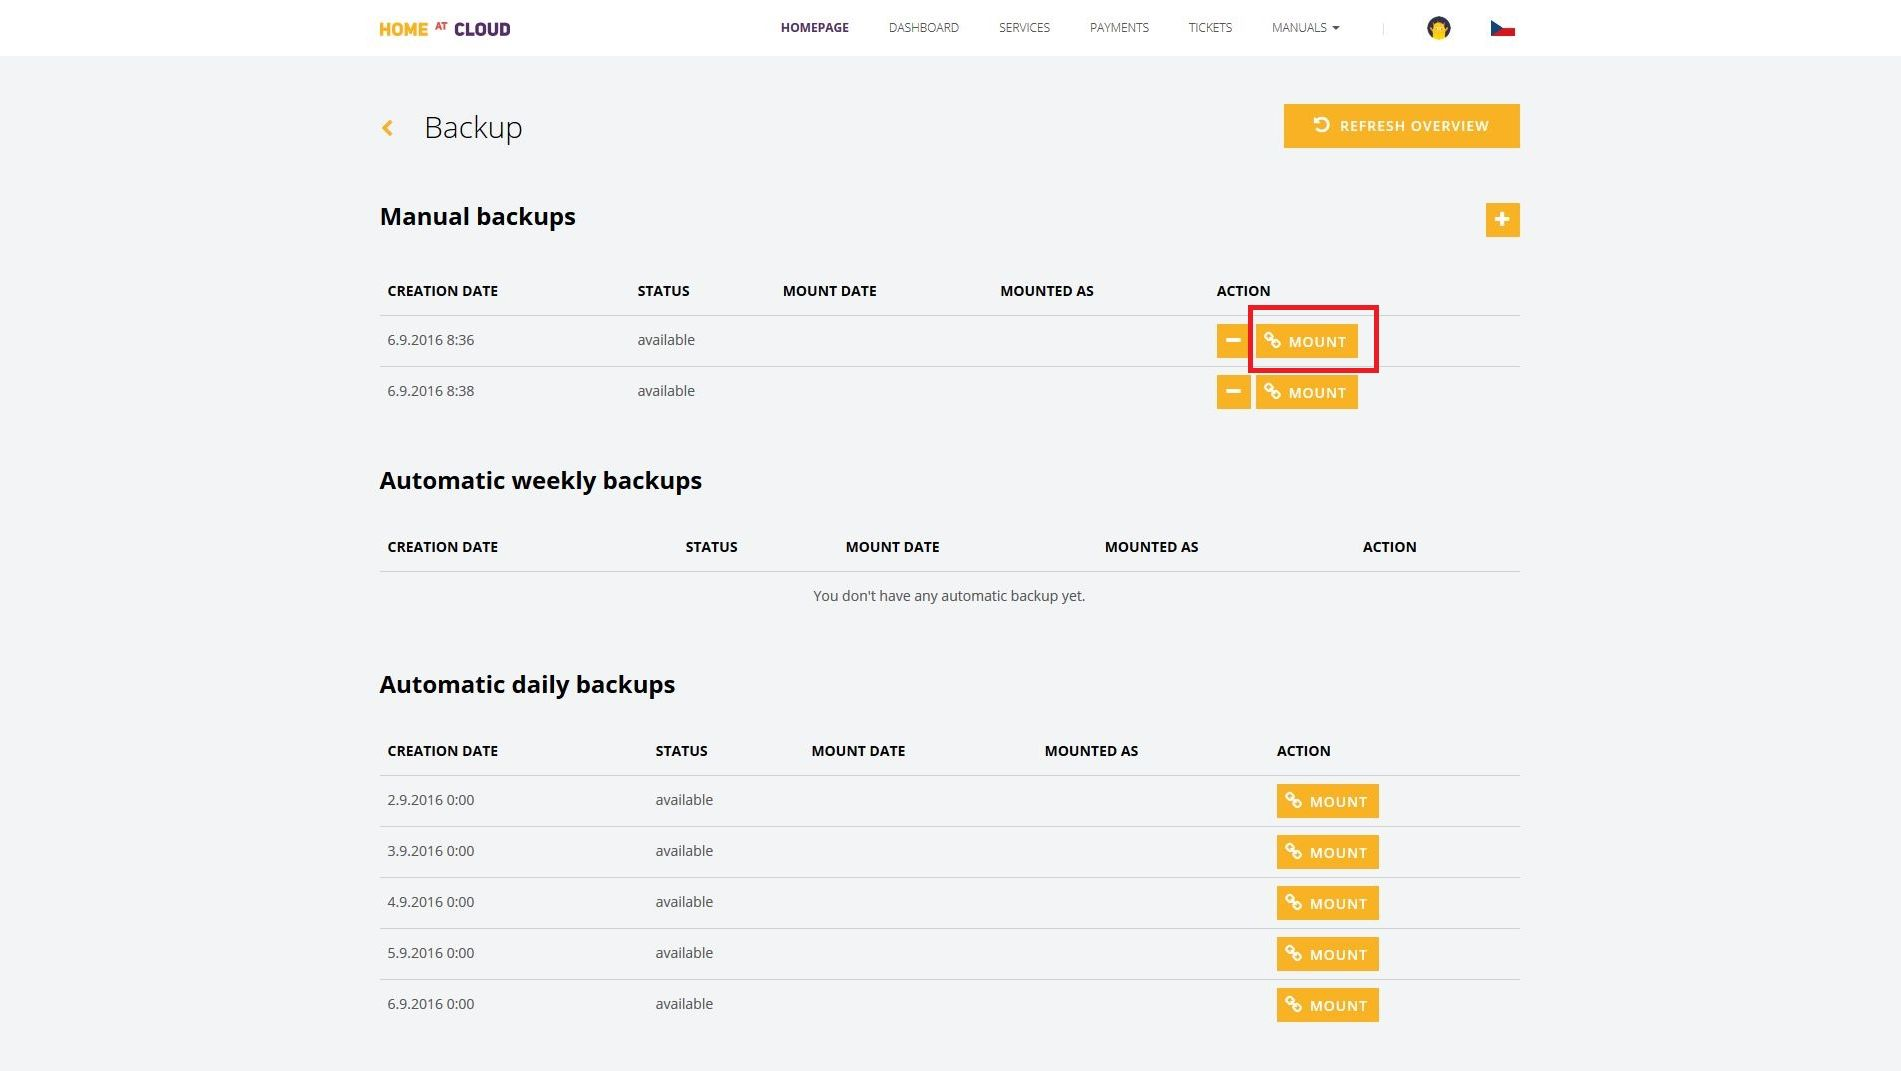
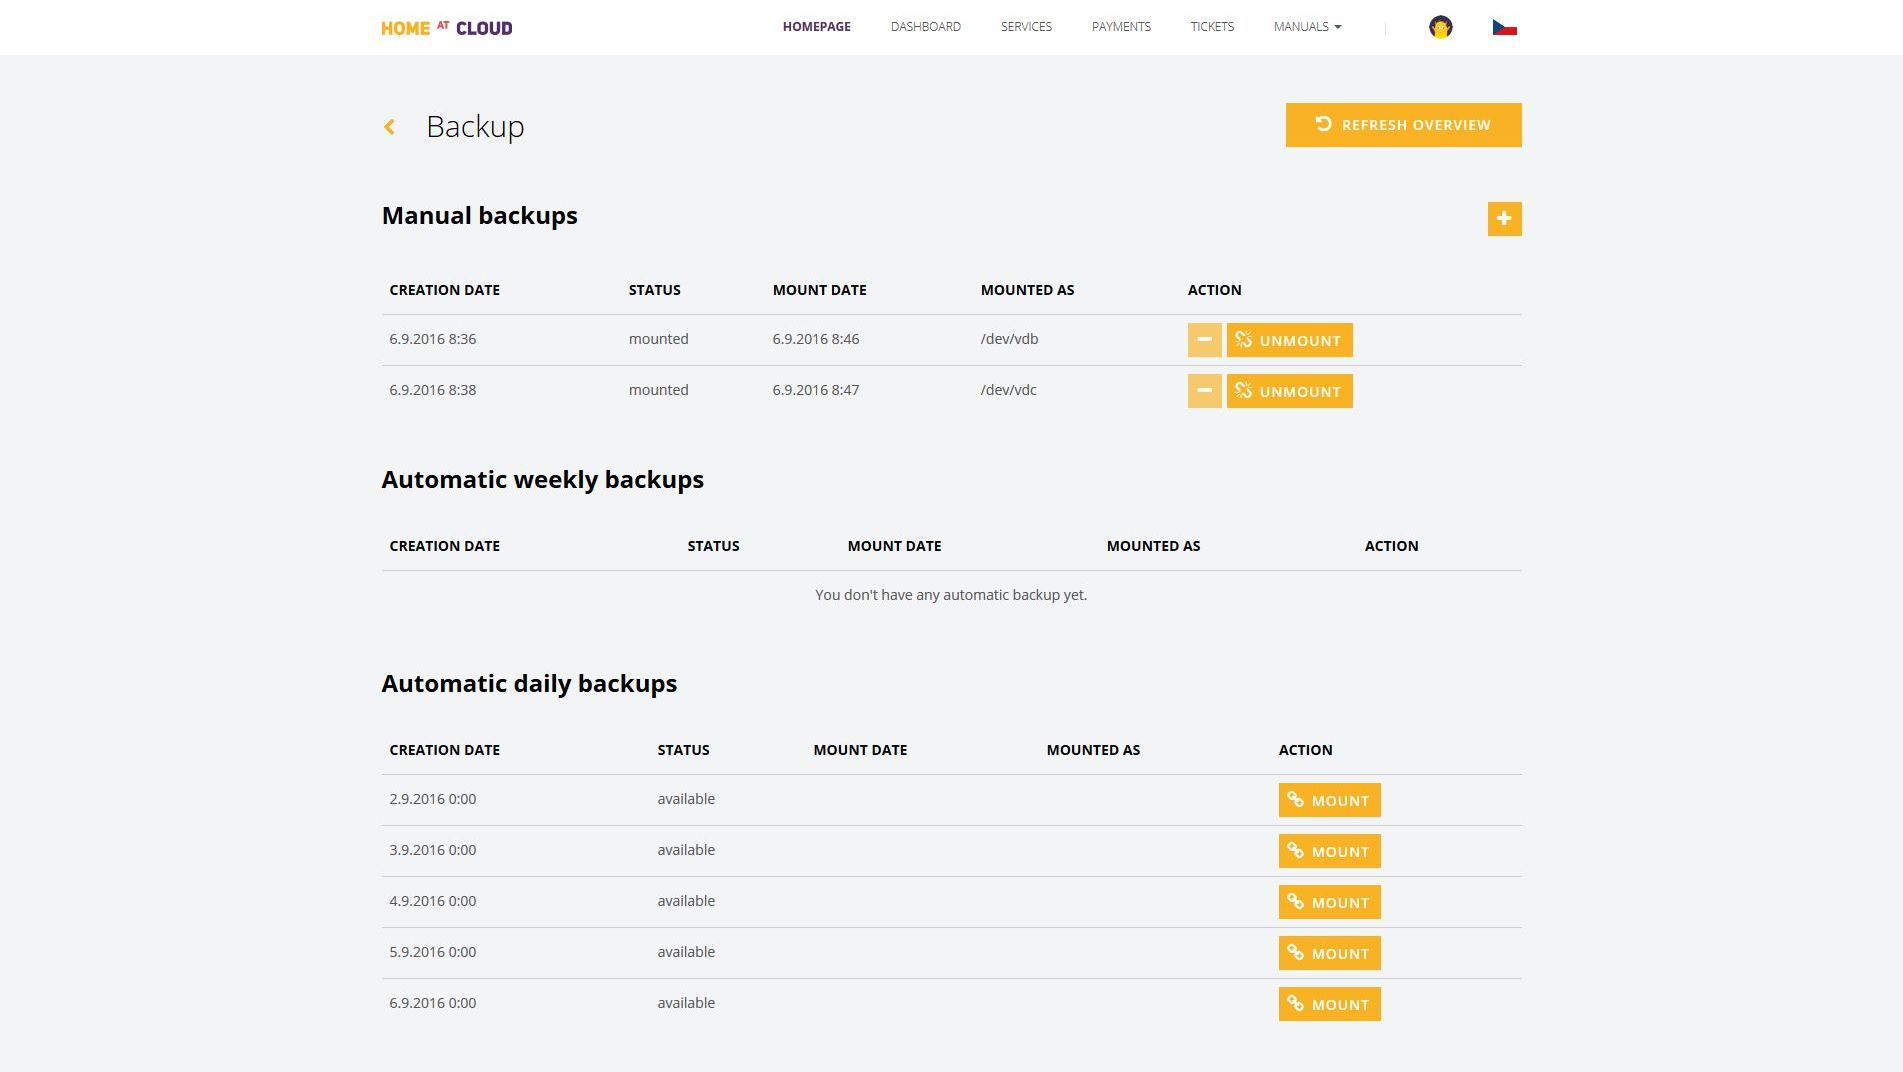
We choose the desired backup from the list of the existing backups (the backup must be in the „available“ state) and hit the button „Mount“ on the right of the respective row. The given backup will transfer into the „mounting“ state. We wait for the moment (the mounting should take several minutes) and then we click on the „Refresh overview“ button. The given backup should be mounted by now, that is it should be in the „mounted“ state. Should it be still in the state „mounting“, we try to refresh the overview of the existing backups once again in a moment. This way, we can mount more backups, which is in the state „available“ simultaneously.
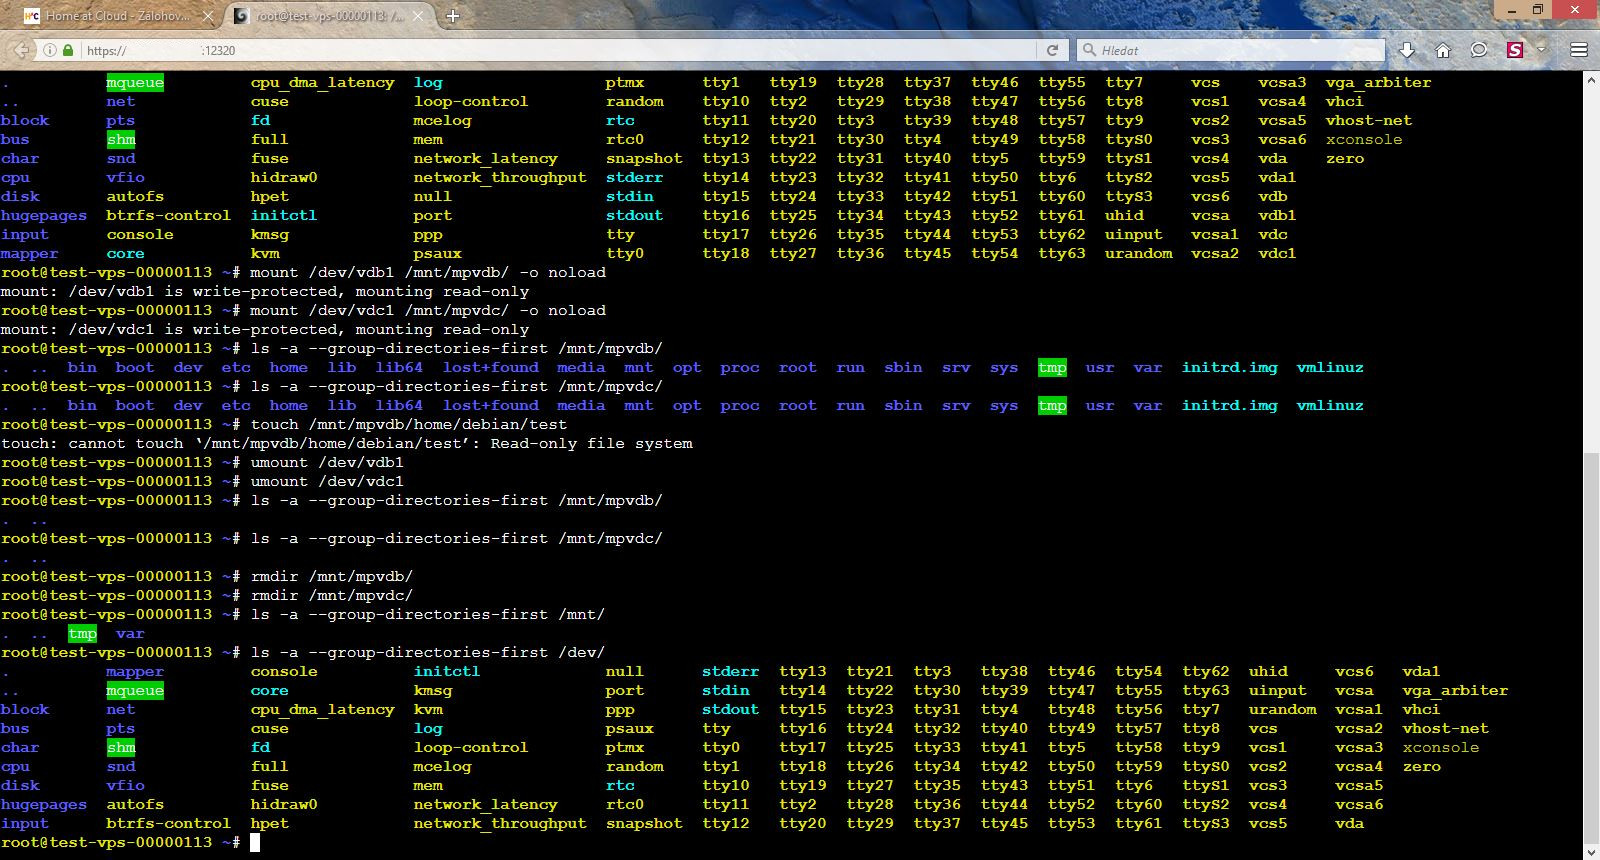
We verify the successful mount of the backup from within the given VPS machine once again. We therefore traverse to the window (tab), where there is the connection to the given machine opened. In the VPS with the GNU/Linux OS, we use the ls -a /dev/ command again, which now tells us, that (if the mounting of the backup from within the customer portal was successful) another volumes are available (here vdb1, vdc1).
In fact, this does not mean, that we can work with the content of the backups. We have just successfully finished the first step and can proceed the second one – mounting of the backup from within the given VPS. We use the mount command for that purpose, in the following manner:
mount /dev/vdb1 /mnt/mpvdb -o noload
Where „vdb1“ is the label of the backup we mount and „mpvdb“ is a label of the mount point (the directory we created earlier for a purpose of mounting the given backup). If we were to mount just one backup, we wouldn’t have to enter the name of the direcory. We then verify the success of the mounting within the VPS by listing the content of the given mount point, using the command ls -a /mnt/mpvdb.
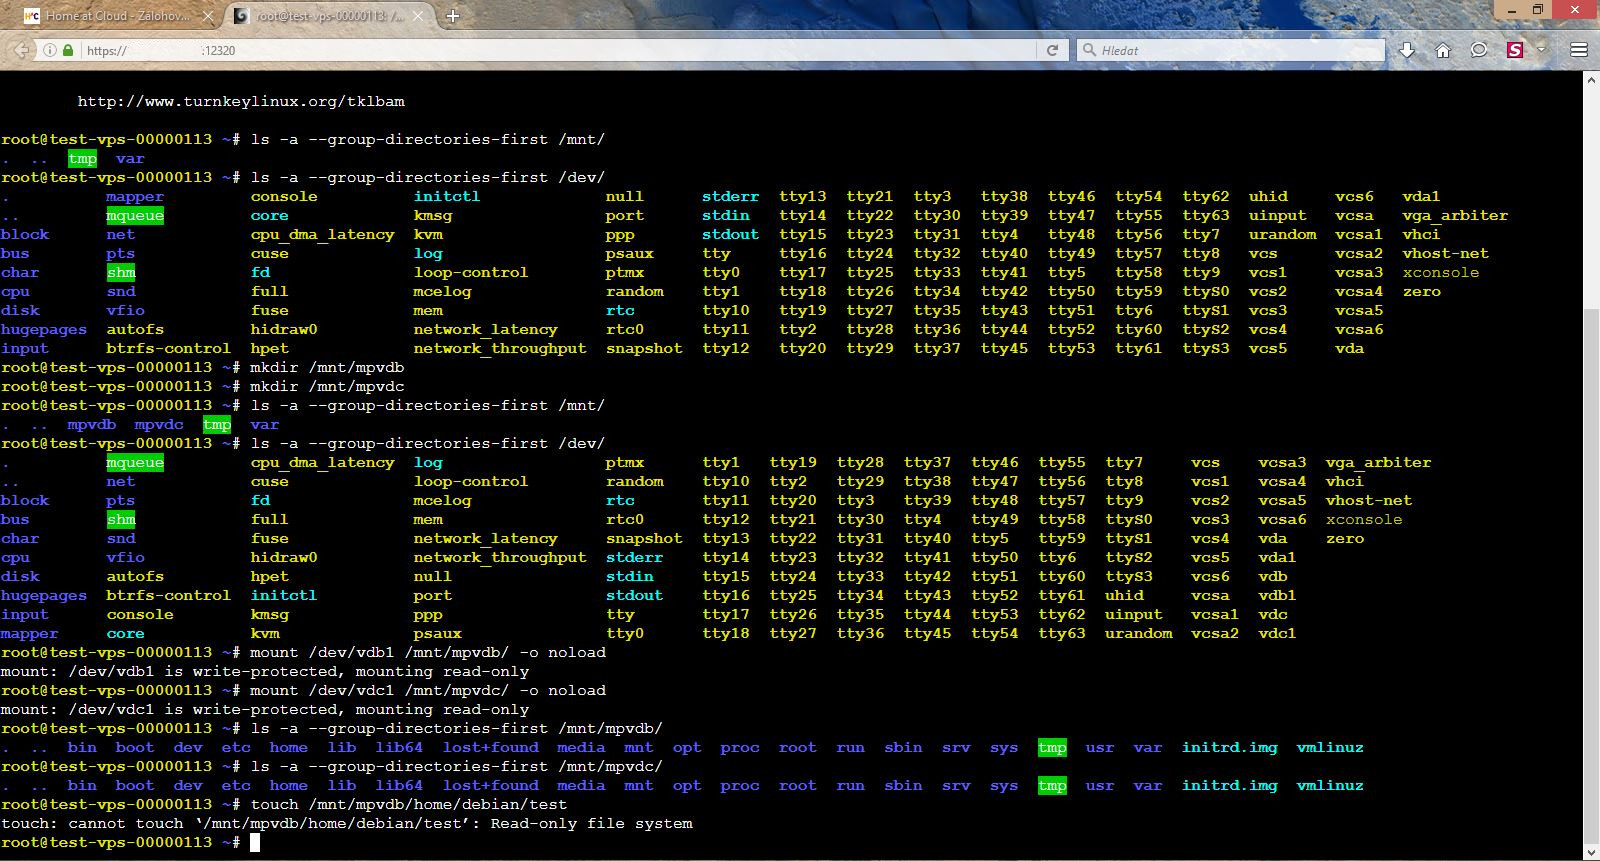
We can see, that inside the directory (mount point) there is the content of the given backup available now. This allows us to easily recover or use the desired data from the given backup in some other way. We can also see, that the stated disk is not writeable because it serves only the purpose of recovering the data from the backup.
In the VPS with the Windows OS, the mounted backup will show up in the disk manager automatically as a new unknown disk – Disk 1 (Disk 2 if we mount another backup, etc.). In fact, this does not mean, that we can work with the content of the backups. We have just successfully finished the first step and can proceed the second one. We mount the backup from within the given VPS with the Windows OS by right-clicking the new volume marked in disk manager. From the context menu shown, we choose the Online option. The system will update the information of the given volume. As soon as the status of the given volume is changed into Online, the backup is ready and we can start working with it.
The backup disk mounted in the VPS with the Windows OS according to the stated procedure, is now available anywhere in the system, e.g. in the file manager. The backups mounted to the VPS with the Windows OS, are available only for 2 hours since mounted. After this period expires, it will be unmouted automatically.
Unmounting of the backup
The unmounting of the backup is rather easy, however we recommend taking ultimate caution when doing so.
In case of the VPS with the GNU/Linux OS, the unmounting of the mounted backup is done in reverse order. Firstly we unmount the backup from within the VPS using the umount /dev/vdb1 command, where „vdb1“ is the label of the backup we unmount. We then verify the success of the unmounting within the VPS by listing the content of the given directory or more precisely of mount point, using the command ls -a /mnt/mpvdb.
WARNING: THE STATED PROCEDURE IS ONLY ILLUSTRATIVE. PROCEED ONLY AT YOUR OWN RISK. ALWAYS REASSURE YOURSELF, THAT YOU REFERENCE THE PROPER DISK. REFERENCING THE IMPROPER VOLUME MAY RESULT INTO UNMOUNTING THE ROOT (OR OTHER) DISK AND THUS UNDESIRED LOSS OF DATA.
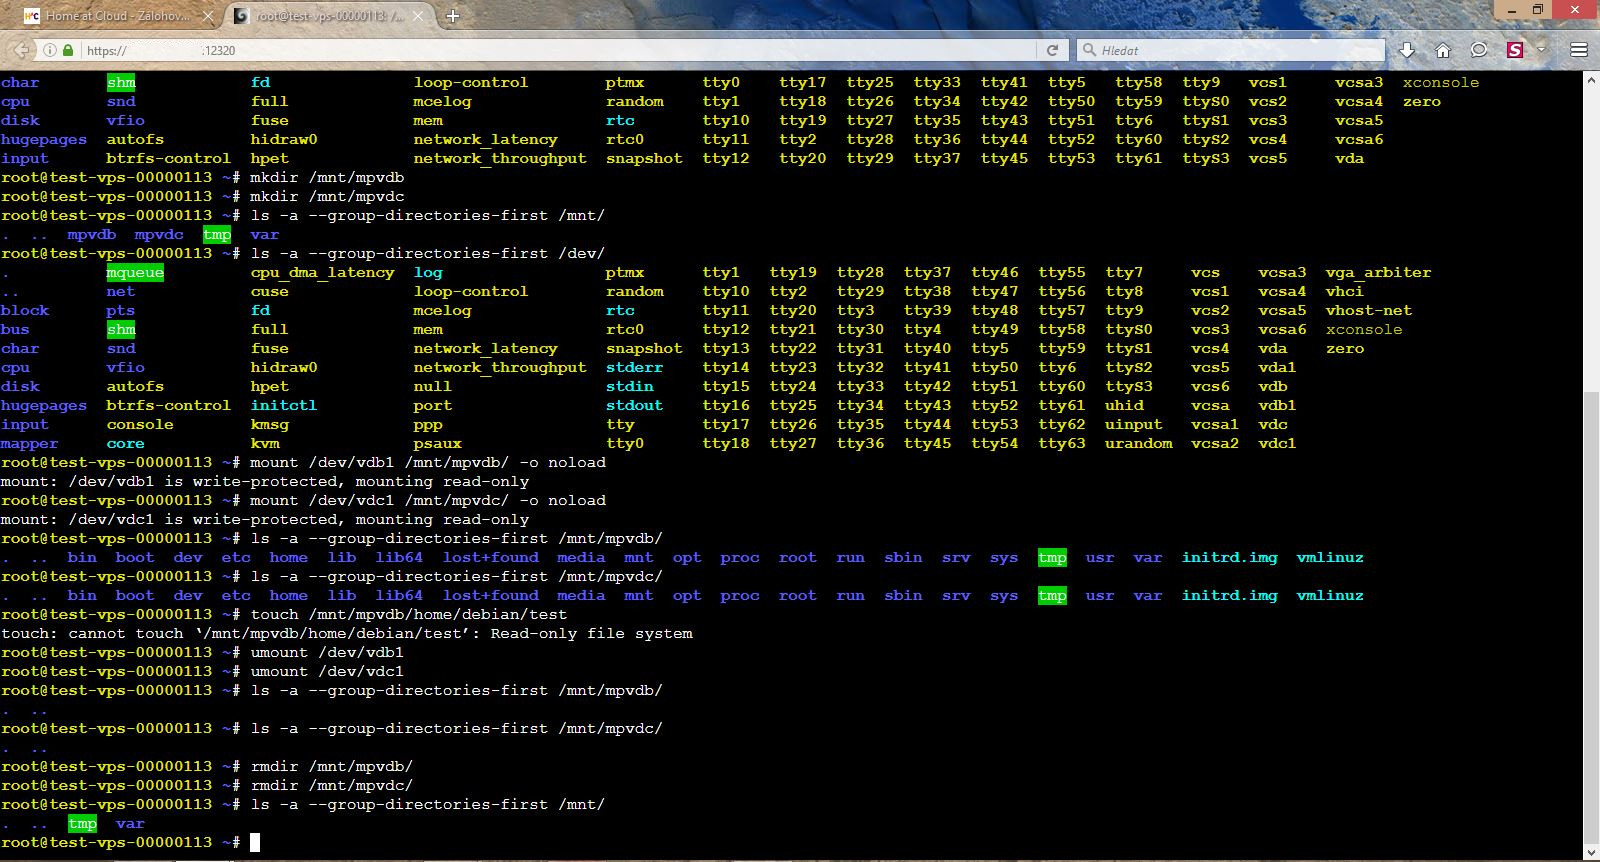
We can see, that the mount points do not contain the mounted backups any longer and that the unmounting of the mounted backups from within the VPS was successful. Using the rmdir command, we can remove the mount points or we can let it be (e. g. if we know that we are going to use it again in the future).
Now, we can proceed to the unmounting of the mounted backup from within the customer portal. This operation is executed from the overview of the available backups of the given VPS, by clicking the „Unmount“ button which initiates unmounting of the given backup. The backup’s state will go from „unmounting“ to the „available“ state after the unmounting is successfully finished. We verify the change of the state by hitting the button „Refresh overview“ or by reloading the page in the browser with the use of the Ctrl + r shortcut or the F5 key.
From within the VPS, we can use the ls -a /dev/ command, in order to verify that the backups are not available any longer and that it had been unmounted successfully.
In case of the VPS with the Windows OS, there are two options to choose from. As mentioned before, the backups mounted to the VPS with the Windows OS are unmounted automatically after two hours. Hence, the first option is to let the given period expire. The system will unmount the given backup automaticallly without any need for intervention of any kind.
The second option is to unmount the mounted backup manually, that is, from within the Customer Portal. This operation is executed from the overview of the available backups of the given VPS, by clicking the „Unmount“ button which initiates unmounting of the given backup. The backup´s state will go from „unmounting“ to the „available“ state after the unmounting is successfully finished. We verify the change of the state by hitting the button „Refresh overview“ or by reloading the page in the browser with the use of the Ctrl + r shortcut or the F5 key.
After the backup is unmounted successfully, in the given VPS, it is available neither in the disk manager, nor anywhere else in the system.